
Introduction
Welcome to the first installment of our comprehensive Desmos Tips series for the digital SAT (dSAT)! This initial guide, “Part 0: Tips & Tricks,” is designed to lay the foundation for the upcoming blog series, where we will explore various question types on the dSAT that can be efficiently solved using Desmos.
In this introductory post, we’ll cover essential tips and tricks that will streamline your use of Desmos and make your dSAT preparation more effective. From mastering key keyboard shortcuts to understanding crucial functions, these insights will help you navigate Desmos with ease. As we progress through the series, we’ll build on this foundation, diving deeper into advanced techniques and specific strategies tailored for the dSAT.
Stay tuned and get ready to enhance your Desmos skills, ensuring you’re well-prepared to tackle the digital SAT with confidence!
Important Keyboard Shortcuts
Here are some general keyboard shortcuts that will make things easier in Desmos! The more you practice, the easier Desmos will be to use!
| Multiplication | * (SHIFT + 8) |
| Divisions / Fractions | / |
| Exponents | ^ (SHIFT + 6) |
| Absolute Value | | | (SHIFT + \) |
| Greater than | > (SHIFT + . ) |
| Less than | < (SHIFT + , ) |
| Square root | Type: sqrt |
| Cube root | Type: cbrt |
| Nth root | Type: nthroot |
| Mean | mean() |
| Median | median() |
| Standard Deviation | stddev() |
Important Points:
X-intercepts and Y-intercepts
When a question asks about x-intercepts or y-intercepts, Desmos can help us! Desmos conveniently clicks to and displays the intercepts on both the x-axis (horizontal line) and the y-axis (vertical line). For example, in the image below, we can see our x-intercept is (2,0) and our y-intercept is (0,6).

Intersections
Desmos also helpfully identifies the intersection between two graphs. In the image below, Desmos shows us the two functions intersect at (1,3).

Maximums and Minimums
Sometimes, the dSAT asks us about the maximums or minimums of functions. This would be the “peak” or “valley”, and Desmos will helpfully label them for us when we click on them. In the image below, the maximum (“peak”) of the function is (2,1).

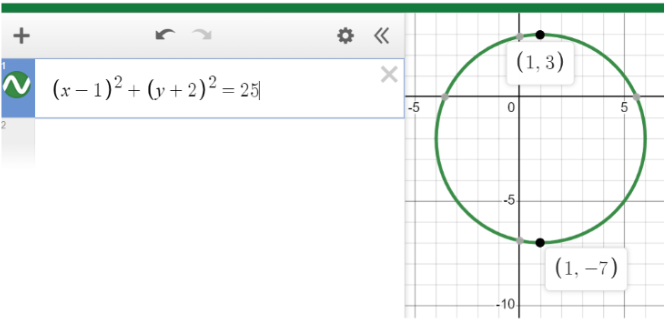
Circle Corner Points
Desmos also helpfully clicks to the top and bottom points on a circle. It won’t label the side points as easily, but if you trace the side of the circle, it will snap to the side points. However, usually the top and bottom point are sufficient for finding the diameter and therefore radius of the circle. For example, points (1,3) and (1,-7) are 10 units apart, so the diameter is 10 and the radius is 5 for this circle.
Important Desmos Functions:
Copying Equations:
If you ever need to type in several equations that are similar to each other, you can type in the first equation, then hit the “gear” button circled in the image below.

When you click this button, you’ll have the option to create copies of that equation by hitting the “copy” button circled below. You can create as many copies as you need, hit “Done”, and then edit the copies as needed!

Zooming In and Out
Sometimes, we have to Zoom in and out a bit on Desmos. Hitting the “home” button on the right side will allow you to return to the window shown in the image below.

Radians vs. Degrees
For some of the angles questions, especially if you need to find the trig function values of an angle, we need to set our calculator to either radian or degree mode. You can do this by selecting the “tool” button, then toggling between radians and degrees at the bottom of the pop-up window.

Conclusion
Mastering Desmos for the digital SAT can significantly enhance your problem-solving efficiency and accuracy. This guide has provided essential tips and tricks to get you started, from crucial keyboard shortcuts to key functionalities like identifying intercepts, intersections, maximums, and minimums.
By familiarizing yourself with Desmos’ features, such as copying equations, zooming in and out, and toggling between radians and degrees, you’ll be well-equipped to tackle various question types with confidence. As you continue through this blog series, you’ll discover more advanced techniques and applications of Desmos that will further aid your SAT preparation. Practice regularly, and soon these tips and tricks will become second nature, making Desmos an invaluable tool in your test-taking arsenal.
Stay tuned for our upcoming “Desmos Tips” blog series, where we will dive deeper into specific functionalities and strategies to maximize your use of Desmos on the SAT. With each new post, you’ll gain more insights and practical advice to help you ace the digital SAT with ease.
Interested in learning more about Test Prep at Mindfish?
Contact us today to find out what our dedicated tutors can help you achieve.